March 24, 2014

Slow Cooker Ropa Vieja


This dish was inspired by my Best Friend and this week just so happened to be her birthday!(We celebrate for more than just one day!)So a humungous Happy Birthday to you!!!

While we were living together in Delray Beach, she discovered what would become one of our favorite restaurants. Her parents had come down for a visit and she took them to the "new" restaurant on the strip, Cubana el Ray. She came home so excited for us to go and I just had to try the Ropa Vieja. 

On my very first visit and my very first bite, I fell in love with it. A delicious slow cooked shredded flank steak served over Cuban rice and beans. How could you not love that?!?

It wasn't until now, unfortunately, that I decided to try and recreate one of our favorite meals!

Ropa Vieja

1 (2lb) flank steak
3 tablespoons olive oil, divided
1 tablespoon garlic powder
2 teaspoons salt
1 1/2 teaspoons pepper
1 red onion, sliced
1 red bell pepper, sliced
1 jalapeno, diced
5-6 garlic cloves, minced
2 chipotles in adobo and sauce
1/2 cup dry white wine
3 tablespoons brown sugar
1 tablespoon onion powder
1 tablespoon garlic powder
1 tablespoon cumin
1 tablespoon chili powder
1 teaspoon dry mustard
2 teaspoons salt
1 1/2 teaspoon pepper
3 tablespoons tomato paste
1/2 cup ketchup
1 (15 oz) can fire roasted diced tomatoes
1 can beef stock

In a dutch oven heat 1 tablespoon of olive oil over medium high heat. Season the flank steak with garlic powder, salt and pepper. Sear the steak on both sides, about 3 minutes a side. Remove and set aside. 


In the same dutch oven, over medium heat, add 1 tablespoon of olive oil and onions. Season with salt. Cook the onions slowly until caramelized, 20-30 minutes. Remove the onions and place in the bottom of your slow cooker.


Place the flank steak and all of its juices on top of the caramelized onions. 

To the dutch oven add another tablespoon of olive oil, the red bell pepper and jalapeno. Cook for 3 minutes. Add the garlic and cook for another 2 minutes. Add the chipotles in adobo and about 1 tablespoon of the sauce. Cook for another 2 minutes. Add the white wine and cook completely down. 


Add the brown sugar, onion powder, garlic powder, cumin, chili powder, dry mustard, salt and pepper. Cook for 3 minutes, toasting the spices. Add the tomato paste and ketchup and mix well. Pour in the fire roasted tomatoes, mixing well. Add the beef stock and bring to a simmer. 

Pour the bell pepper mixture over the flank steak in the crock pot. Make sure the steak is covered. If not add more beef stock or water. 


Cook the Ropa Vieja on low heat for 8 hours. I tasted the mixture throughout the cooking process and added more salt when needed. 


Remove the flank steak and shred. Place back in the slow cooker and mix well. 


Serve over Cuban rice and beans (blog to come!)

I mean where has this been all of my life??? not to brag but..."Nailed It!"


Happy Birthday P-Bunny!! We have a lot of great memories and lot of great food!

Simply,
Meg

Adapted from Lauren Ariza
<a href="http://www.bloglovin.com/blog/13479031/?claim=pxpwz3gbmxp">Follow my blog with Bloglovin</a>


February 23, 2014

Sausage, White Bean and Kale Soup


Sometimes you just get a craving... But a craving for something you have never eaten before??? A little weird, huh!

Maybe it's because everything you read today is all about the new "super food" kale! I found myself in the grocery store craving this green that has never passed my lips. I cruised the produce section wondering, how can I convince my husband to eat this (big challenge) and how can I eat this. 

My husband, before we began dating, never let anything green pass his lips. Nothing!!! I would find him fishing around anything green or a vegetable that wasn't starch in anything I cooked. He has slowly become more and more adventurous with what he will try and eat. I started by wrapping any vegetable I could in bacon. Then slowly began removing the bacon from the dishes. He is now eating spinach salads(spinach anyway really), green beans, brocolini, mushrooms, onions, tomatoes and the list goes on. Having a little trouble getting him to come around to asparagus.... Any ideas?? 

It has been so much fun finding new delicious ways to cook all these vegetables and so rewarding when he loves them...love is a strong word to use toward his relationship with vegetables, likes them. 

After some thought I decided to make a soup. I have seen many soups with kale, but ones that I really seemed drawn too were with sausage and beans. Off I went filling my cart with anything that sounded delicious to throw in my pot!

Sausage, White Bean and Kale Soup

1 package andouille sausage, diagonally sliced (1/2 inch pieces)
1 tablespoon olive oil 
1 large chopped onion
5-6 minced garlic cloves
1 can tomato paste
3 cans of cannelli beans, drained and rinsed
1 can diced fire roasted tomatoes
3-4 cups chicken broth
3 cups chopped kale
1 tablespoon garlic powder
1 tablespoon onion powder
1 teaspoon salt
1 teaspoon pepper
1/2 teaspoon cayenne pepper
Shredded Parmesan cheese (optional)

Heat a large Dutch oven over medium heat. Add the sausage and cook until browned. Remove the sausage and set aside. 


Add the olive oil and onions; cook, stirring often until the onions begin to soften, about 3 minutes. Add the garlic and cook for 2 minutes. 

Add the tomato paste and stir until completely combined with the onion mixture. Cook allowing the paste to caramelize, just a little bit.

Add the beans and fire roasted tomatoes, stir well. Cook for 5 minutes allowing the beans to soften. Scrape  up all of the caramelized bits on the bottom of the Dutch oven.

Add the chicken broth, one cup at a time. Stirring and mixing well before adding the next cup. Continue adding the chicken broth until you reach the consistency that you prefer. Keeping in mind that the longer you cook the soup, the more the liquid will cook down. 

Add the kale, salt, pepper, garlic powder, onion powder, and cayenne pepper. Stir well and bring the soup to a simmer. Cover and continue to simmer until 10 minutes before serving. Taste the soup and season to taste with salt and pepper. 

Garnish with shredded parmesan.
Serve with grilled cheese or crusty baguette.


Note: You do not have to use andouille sausage. You could make meatballs, or add chicken sausage, Italian sausage, or any sausage that is a favorite. 

And by they way.... My husband LOVED it!!!!

Simply,
Meg


January 31, 2014

Homemade Ranch Dressing

Some people already know this about me. To some it may come as a shock even gross maybe......

Throughout my life I have had a long standing love affair with Ranch Dressing. I do not put it on everything, but everything that I can. My favorite is the Ranch and Ketchup/BBQ combo. I will eat it with french fries, baked potatoes, leftover mashed potatoes, burgers, sandwiches, wraps, panini's..... you get my drift. 


Recently I have been questioning this love affair.... is it all that healthy of a relationship(no)? Even in moderation(maybe)? 

I do try very hard to stay away from processed foods, but at times its hard to totally escape not consuming it. Lately I have paid more attention to the taste of things and the taste of bottled ranch seems very processed. So it made me think....What is really in it? How does that bottle last so long in the fridge? 

So to help mend my relationship problems, I decided to make my own. Have more control in this relationship and what exactly goes into it. 

After making this my problems are solved. I may never go back!

Homemade Ranch Dressing 

1 cup plain nonfat greek yogurt (or low fat sour cream)
1/4-1/2 cup milk or cream 
1-2 tablespoons mayonnaise 
2 tablespoons chopped fresh dill 
2 tablespoons chopped fresh chives 
1 1/2 tablespoons garlic powder 
1 tablespoon worcestershire sauce
1/2 teaspoon salt 
1/4 teaspoon cayenne 

In a bowl combine all of the ingredients. Whisk together well. Pour into a mason jar or an air tight container. Keep refrigerated. 

Simply,
Meg


Adapted from The Wholesome Cook.

January 12, 2014

The "Ultimate" Standing Rib Roast


This New Years Eve we hosted a small dinner party. It was suppose to be six people but one couple caught an awful bug that had been going around. Luckily my husband was on the recovery slope from it at this point. So it ended up just being the four of us. It took me no time to figure out the menu but was a little worried about how to pull it off flawlessly. I know the rule of thumb is to always serve dinner guests a meal that you have made before..... Well I would like to take that little rule, crumple it up and toss it away. I personally think that it is a perfect opportunity to try something new.. something you have always wanted to make. For me, it keeps cooking fun and adventurous. As a friend has recently taught me "if it ends up sucking, you can just throw it away and order pizza". I mean who doesn't love pizza?!?


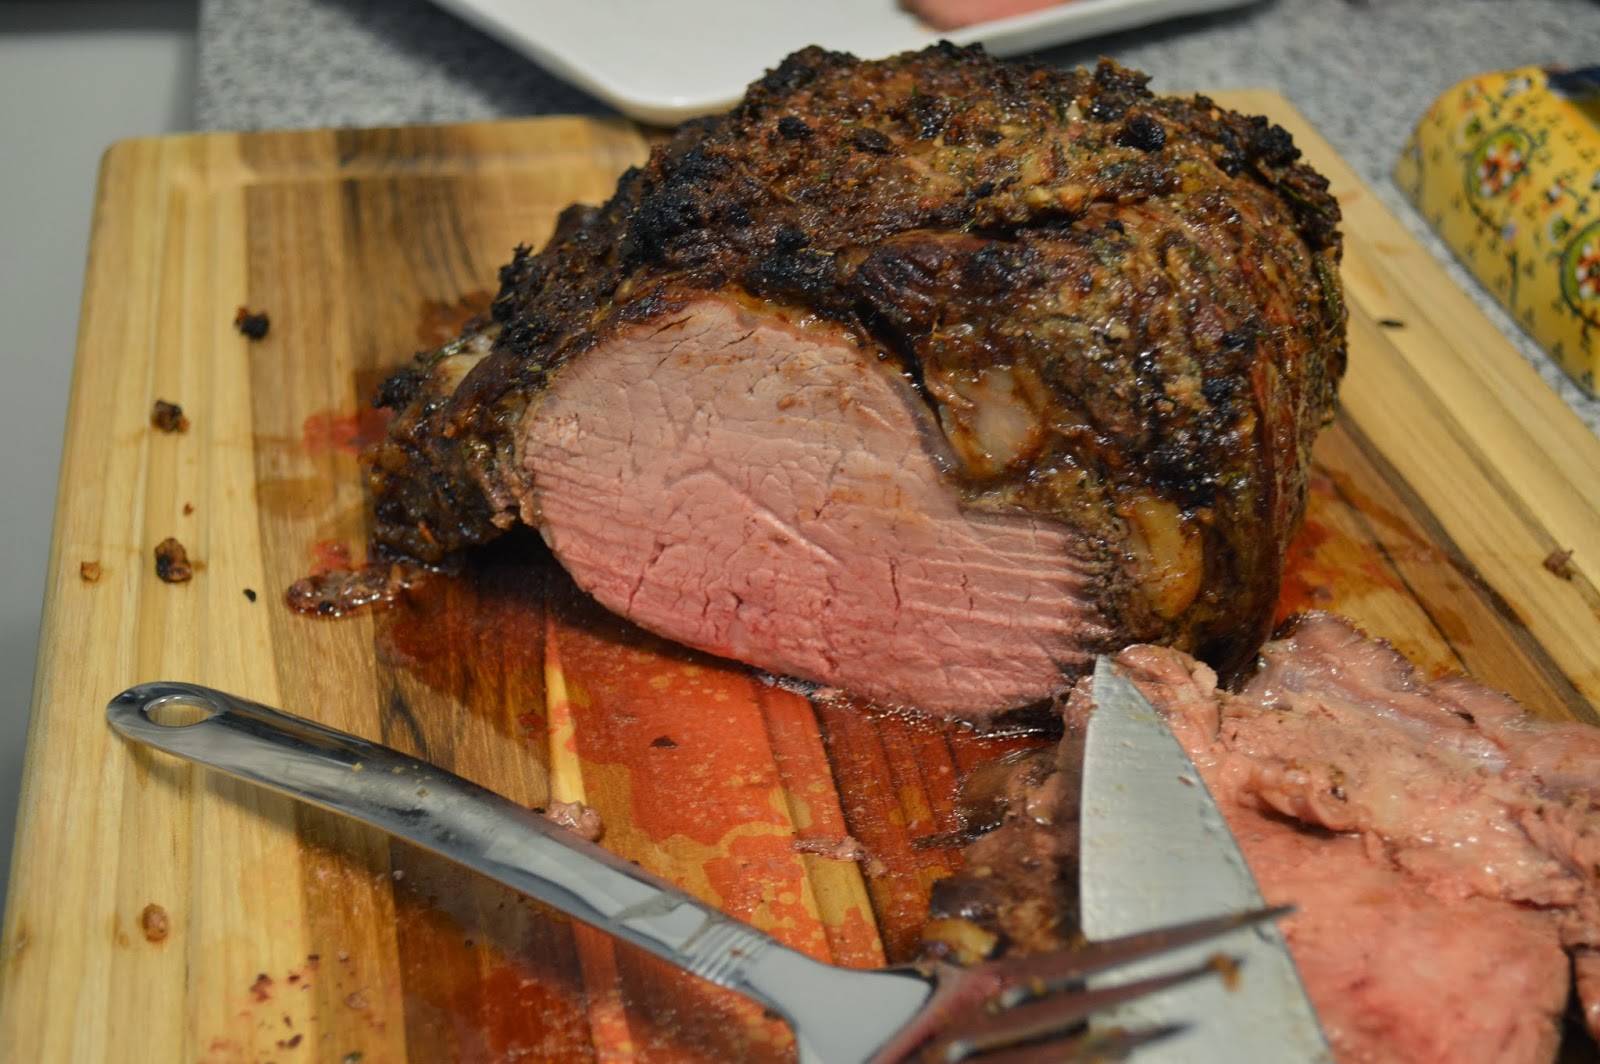
So I decided to tackle my very first standing rib roast. I approached this as I would any competition. I had to find the perfect strategy. I definitely did my research, consisting of You Tube and google searching. It seemed everyone had a different way to flavor and cook the "perfect" or "best in the world" standing rib roast. In the end, I combined a few cooking techniques and came up with my own flavor blend.

Two of my biggest decisions were brining home the right amount of meat and what internal temperature to cook it to. 

Here is a good rule of thumb for the amount of meat needed per person:
3/4 lb. per person or:
1 rib per  2 people
2 ribs per 4 people
3 ribs per 6 people
4 ribs per 8 people
5 ribs per 10 people
and so on.... 

I ended up buying a 6.25 lb (3 bone) standing rib roast from Costco. For 4 people it was more than enough. Since I had originally planned for 6 we had about 6 healthy slices of meat left over. 

For the internal temperature and doneness of your meat I used this:
Rare           120-125 degrees
Medium Rare    130-135 degrees
Medium         140-145 degrees
Medium Well    150-155 degrees
Well Done      160-165 degrees

We cooked the roast to about 133 degrees, removed it from the oven and let it rest for about 20 minutes. It ended up being closer to a medium doneness. The meat still cooks after you remove it from the oven. So, be aware of how long you allow the roast to rest and allow for more cooking while resting. Honestly, for me it was a little overdone. Next time I would remove the roast at about 125 degrees and then allow to rest.

The "Ultimate" Standing Rib Roast

Helpful Tools
Food processor or blender
Roasting Pan
Butchers twine
Roasting meat thermometer

Ingredients                                                
5-6 pound rib roast with bones                      
2 tablespoons olive oil                                   
10-12 cloves of garlic, smashed                    
1 tablespoon fresh rosemary                          
1 1/2 tablespoons fresh thyme
1 teaspoon salt
1 teaspoon pepper
1 tablespoon onion powder
1 tablespoon garlic powder
1 teaspoon mustard powder
2-3 tablespoons butter, softened

You want your standing rib roast to be at room temperature before it even goes near the oven. I would recommend taking it out about 2-4 hours before cooking, depending on the size of the roast. However you can lather that hunk of meat up the night before to save you a little time and to let the flavors absorb into the meat.

The rub - In a sauté pan over medium heat, add the olive oil, garlic, rosemary, thyme and salt. Saute for 10-15 minutes to allow the flavors to infuse into the olive oil. Stir frequently to make sure your garlic and herbs do not burn. Add the garlic, herbs and oil to a food processor. To that, also add the pepper, onion powder, garlic powder and mustard powder. Pulse until well blended. Pour rub into a bowl and add the 2-3 tablespoons of butter. Mix together well.


The meat - I decided to cut the rib bones away from the roast barely leaving them still attached. Taking a very sharp knife, cut as close to the bone as possible. This will make removing the bones after cooking and slicing the meat easier. You will want to tie the ribs to the roast with butchers twine at this point. Wrap the twine completely around the meat and the bones, making sure the twine goes between the bones. I tied the meat in 3 different places. This will prevent the roast from pulling away from the bones and overcooking of the meat.


After the bones have been cut away from the roast and you have tied the meat up, place the roast rib side down, into the middle of your roasting pan. You do not need a roasting rack as the ribs will act as the rack. Take the butter and herb mixture and rub it all over the meat. Make sure you coat the whole roast, even the sides. Cover with plastic wrap and place in the refrigerator until 2-4 hours before you are ready to cook the meat.

Now you are finally ready to cook this thing. Pre-heat the oven to 500 degrees. Insert the meat thermometer into the thickest part of the meat, making sure not to heat any bone, if you decide to keep them attached. Once the oven has reached 500 degrees, quickly place the roast in the oven and shut that door. You should NEVER OPEN THE DOOR AGAIN, until you are ready to take the roast out of the oven. 


Cook the roast at 500 degrees for 20 minutes. This will be putting a nice sear on the meat. 

After 20 minutes reduce the heat to 325 degrees. Again no need to open the oven door. If you are anything like me and need a peak, just turn on that oven light and do a little window gazing. 

Cook the meat at 325 degrees until you have reached your desired doneness. Your meat will take about 15-17 minutes per pound for medium rare. This is an estimate and I highly recommend to keep a close watch on your meat thermometer. 


After removing the roast tent it with tin foil and allow it to rest for 10-20 minutes. Your roasts internal temperature will rise about 5-10 degrees. So keep this in mind.


The rest of my menu:
I served my standing rib roast with a side of garlic mashed potatoes, a fall harvest salad, pan drippings gravy, and a horseradish sauce. 

Pan Drippings Gravy
Add the pan drippings into a sauté pan over medium high heat. Add 2 tablespoons of flour and whisk into the drippings. Add about 2 cups of beef broth, stir well until completely combined and there are no lumps. Bring to a simmer and allow to thicken, constantly stirring. 

Horseradish Sauce
In a bowl combine 1/4-1/2 cup horseradish, 1 container of sour cream, 1 tablespoon dijon mustard, 1 teaspoon garlic powder, and a splash of lemon juice. Mix well.

All in all I would say the dinner was a success!!!  And remember, never be afraid to be a little adventurous in the kitchen!!!


Happy New Year from the Rogers!!

Simply,
Meg


January 8, 2014

I am back!


 I am back!!!!!!!!!!

Over the last year every ounce of creativity and most, well all of my time was devoted to wedding planning. MY WEDDING!!!! Let me tell you planning a wedding is no joke. On December 27th, 2012 my boyfriend (now husband) gave me the biggest surprise of my life and proposed. I had no idea it was coming.  For me that was the most perfect part about it! Immediately we began wedding planning. I have to admit I was completely shocked with how quickly it all started to come together. Typically I am quite the procrastinator but not this time. I was all over it. I wanted first pick of everything, food, music, venue, you name it. I will admit that I did get a little bit crazy at times. You know that total bride breakdown, crying and everything, but for the most part I kept myself together.

I had always envisioned my wedding (as all little girls do) to be at my childhood home. After much consideration we decided it would be healthiest for us all to have the wedding somewhere other than my parents house. There were quite a few conflicting ideas on how it was going to go down!

We still wanted to have the wedding in the county since we were both born and raised there. We found an absolutely breath taking venue and it couldn't of fit us better. The ceremony would take place on top of the hill looking over the town and the Blue Ridge Mountains as our back drop. The cocktail hour and ceremony would be held in the largest standing dairy barn east of the Mississippi, just down the hill.

After months and months of planning, everything had finally come together. I have to give a lot of credit to our wedding planner who created an atmosphere beyond my imagination. Down to every detail she "NAILED IT!".

The day of the wedding we couldn't of asked for a better day. We had timed the fall colors perfectly, at their peak! The feel of our ceremony was for us, enormous. We were surrounded by so much love and so many of our favorite people. The evening went as smoothly as you could possibly imagine. The food was great, the bands were all awesome and an amazing group of family and friends were having the best time ever!!!

So with all of the planning, there hasn't been a lot of time for cooking, blogging or crafting (other than center pieces, programs, and all the other wedding items!) I am hoping, no, I will be introducing myself, back into the blogging world. As you can tell if you have followed before, my blog is under a little construction, so please bear with me. Hopefully it should be up and running in no time! So stayed tuned!!!

Simply,
Meg
Follow on Bloglovin